Deploying the RuBAN 5 OVA
- Daniel Dold (Unlicensed)
- Joseph Quinn
- K (Unlicensed)
To set up the OVA file do the following;
- Download the latest OVA from our Downloads page.
- Extract the contents of the ova file.
- You should be left with 4 files - .mf, .ovf, .vmdk and .iso

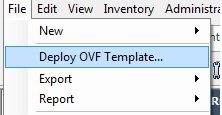
- If using Vmware, deploy the .ovf file: File > Deploy OVF Template
- If using Oracle Virtualbox, delete the .mf file and deploy the .ovf file: File > Import Appliance
- If using Vmware, deploy the .ovf file: File > Deploy OVF Template
- Follow the steps in the wizard and your VM will be added.
IMPORTANT: The default size of the OVA deployed is 8 GB size. To avoid future issues, please increase the disk size by following the instruction in one of these documents:
Extend Disk on a VirtualBox VDI
/wiki/spaces/KT/pages/24870933
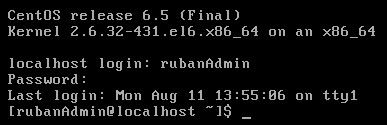
The first time you log in as rubanAdmin you need to execute the firstTime.sh script.
Log on with username / password rubanAdmin / rubanAdmin
Run the following commands:
sudo bash
chmod 755 firstTime.sh
./firstTime.sh
This script will make some changes to the network setup and then reboot the VM again.
When the machine has rebooted, please logon as rubanAdmin again and configure you network settings as required.
The addresses here are only given as examples, please use your own IP,gateway and DNS settings.
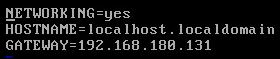
- sudo vi /etc/sysconfig/network
- In "Insert" mode edit the Gateway to match your own Default Gateway
- Press "Esc" and :wq to save and quit
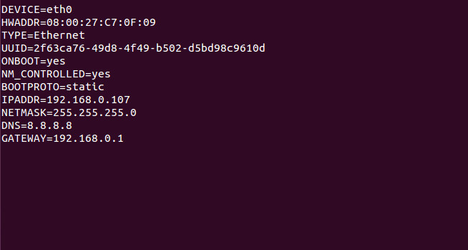
- sudo vi /etc/sysconfig/network-scripts/ifcfg-eth0
- Static IP Address
- In "Insert" mode edit the IP Address/Netmask/DNS information to suit your needs
- Press "Esc" to exit mode and :wq to save your changes
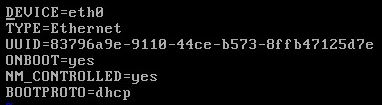
- DHCP
- Delete IPADDR, NETMASK and DNS# lines
- set BOOTPROTO=dhcp
- Press "Esc" and :wq
- Static IP Address
- sudo service network restart
- sudo service ruban restart
To verify the OVA has been installed correctly you can go to the RuBAN UI on your web browser with the following URL;
http://<RuBAN_Server_IP>:58000/eem/eem.html
The login credentials for RuBAN UI are admin / admin
Change date/time and timezone
In order to set the correct timezone do the following commands:
sudo rm -f /etc/localtime
sudo ln -s /usr/share/zoneinfo/<YourZoneInfo> /etc/localtime
Example, setting timezone to Pacific Time:
sudo ln -s /usr/share/zoneinfo/US/Pacific /etc/localtime
To set the correct date do (In this case we set the date to 17 of July of 2015):
sudo date +%Y%m%d -s "200150717"
To set the correct time do (In this case we set the time to 12:00:00):
sudo date +%T -s "12:00:00"